Design Philosophy
My first career was in engineering research and development and these disciplines have heavily influenced how I think about, design, and build guitars.
Having studied the technical aspects of guitar design for nearly 30 years and after having built numerous R&D instruments (as well as many more for clients), I feel I have a good understanding of what great guitar design is all about. And I know just how rare great designs are.
It’s long been known that the best guitars are built “on the cusp of disaster”. That is to say, they are built only just strong enough to survive the static string loads long term so that they are maximally responsive to the excitation provided by plucking the strings.
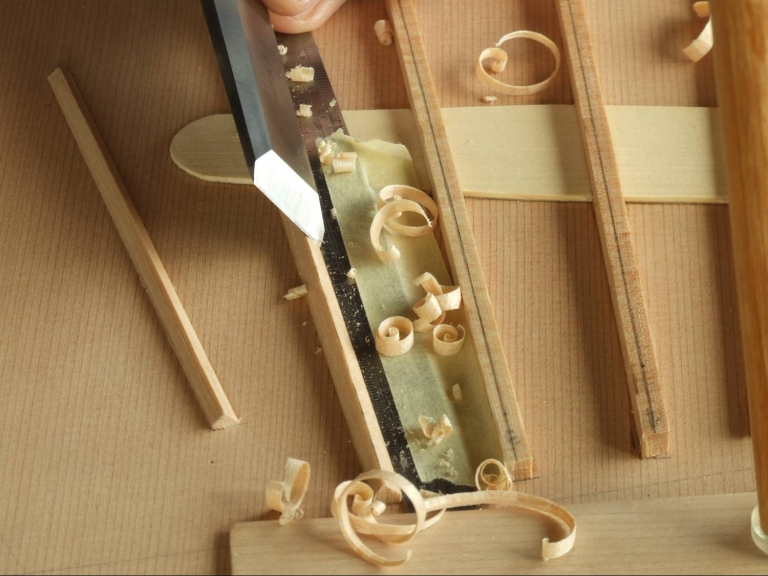
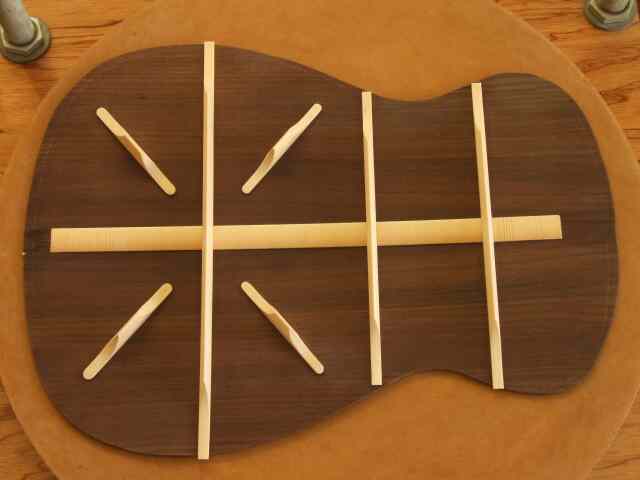
Carving fan braces on a Fleta-style soundboard
However, one immediately runs into a confounding set of technical problems. Firstly, where is this point “on the cusp of disaster”? This, in fact, is not a particularly difficult problem to solve if you apply engineering structural theory and know the strength of your materials (I measure the material properties of all my soundboards and backs before I build them into a guitar).
But the real difficulties arise once the “cusp of disaster” has been arrived at. These difficulties are not well known or well reported for the simple reason that very few people have found the “cusp of disaster” and the corresponding sensitivity and responsiveness of a guitar that resides there.
Responsive guitar design
A sensitive and responsive guitar, by definition, has what engineers call “high average admittance”. Qualitatively, that simply means that the energy from a plucked string is easily admitted to the soundboard in order to produce sound (rather than the energy being reflected back into the string).
But at a high average admittance, some frequencies have too high an admittance. That is, the energy from the string passes too quickly to the soundboard resulting in a clunky sounding note without sustain. The frequencies that these clunky notes occur at are the resonant frequencies of the guitar panels and the enclosed air.
So it’s very important, on a sensitive guitar, to place these resonances at the correct frequencies, so that they do not get in the way of the notes you want to play. If a builder has not considered this issue, it means one of two things: the guitar is not a sensitive, responsive guitar (which is mostly the case) or the guitar has a number of very dud notes.
High average admittance
It’s unquestionable that at least some of the best Spanish builders of classical guitars knew about this many years ago, but it’s unlikely that they called it “high average admittance” or the term I use (and measure) which is akin to it “monopole mobility”.
How do I know? Because the guitars that they built that I have measured show an uncanny predilection for the “right” frequencies of their main resonances. So uncanny that it’s impossible to believe they happened by chance.
On the other hand, the steel string builders, being mainly factories, never arrived at the “cusp of disaster” as their manufacturing methods weren’t reliable enough to keep them on the right side of it without expensive and reputation-shattering warranty claims.
A further difficulty
A further difficulty is that sensitive guitars tend not to play in-tune. There is a good (and very) technical reason for this that I won’t go into here, but it can be greatly alleviated by good string intonation techniques, which is why I compensate both the saddles and the nuts of all my guitars.
So tuning a guitar’s resonances to specific frequencies is important (see Modal Tuning), but only if you have a responsive guitar in the first place, otherwise it doesn’t matter, and it’s this path of least resistance that most builders have unwittingly followed by overbuilding their instruments.
Guitar design techniques
The simplest way of describing my guitar design techniques is to liken them to an instrumented version of how the Spanish masters worked. Rather than relying almost entirely on the senses of hearing and feeling, with years of experiential learning, these senses can be augmented (but not replaced) by modern computerised measurement and analysis techniques. This has led me to greater consistency in construction “on the cusp of disaster”, due to better material selection through to performance optimisation of the completed instrument.
My design techniques are very different from those used by others, to the extent that I have written a book (together with my friend Gerard Gilet) describing my guitar design and build techniques. It is the use of these techniques that make my guitars measurably more responsive, louder and more in-tune to the equally tempered scale than most other guitars and they still hold together for the long term.
These values I summarise as Sensitivity, Playability, Musicality and Longevity. You can read a brief account of my techniques in the Responsiveness, Playability and Musicality sections by clicking on the links. For the details, you will need to read the book.
Responsiveness
There’s a lot more to guitar design than arriving at a pleasing body shape and deciding on the decorative scheme. At some time (one would hope) somebody considered how much static force the strings exert on the guitar and made sure that there was enough wood in the neck and soundboard to sustain those forces, long term.
And, hopefully, someone considered how much dynamic force the vibrating strings exerted on the soundboard, so that those dynamic forces could most efficiently be transformed into sound. And what about the playability of an instrument, or its musicality? Were they ever really part of a considered design or did they just somehow evolve?
It’s a fact that the predominant guitar designs around today for both Spanish guitars (classical and flamenco) and steel string guitars originated, separately, nearly 150 years ago. In the years since, there has been massive progress in science, materials, and computing but the vast majority of guitar designs have remained largely unchanged. The opportunity is obvious.
The science of guitar design
My contribution to furthering the science of guitar design is manifest in the range of classical and steel string guitars I now build. The challenge I set myself was to build more efficient guitars, ones that are more sensitive and responsive to the player’s touch, whilst also being very playable, very musical, and yet built to last.
The results of my work are summarised in the charts opposite, which show the relative responsiveness of my instruments compared to a wide variety of others that I have measured. Whilst the guitars produced by most makers vary considerably from instrument to instrument, I picked the best instruments available to me.
Monopole mobility
The measure that I used to make the comparison I call monopole mobility, a technical term describing how easily a guitar string can drive a soundboard. The easier it is to drive the soundboard, the more sensitive, responsive and ultimately the louder the guitar is.
Monopole Mobility for a range of steel string guitars

Monopole Mobility for a range of nylon strung guitars

However, monopole mobility is not the sole arbiter of a great instrument. The guitar also has to play in-tune all over the fretboard, be even in its volume (no “wolf” notes), have an alluring sound, and pose the minimum impediment between the musician and the repertoire and still hold together for the long term. These values I summarise as Sensitivity, Playability, Musicality and Longevity.
I discuss some of the aspects of these values in the following pages (just click on the headings on the left). If you want more detail, it’s available in the book.
Modal Tuning
Whilst some low frequency sound comes from the soundhole, mostly sounds originate from the moving surfaces of a guitar, mainly the top. If a guitar top vibrates in a different way, it produces a different sound. Guitars have preferential ways of moving, called modes of vibration.
Different modes are characterised by the way the soundboard divides into separately vibrating subsections. The mode shapes and sizes can be observed using Chladni patterns (pictured, top) which define the node lines on the vibrating surface. As one crosses a node line there is a 180° phase change of the motion; i.e. if a surface is moving “up” on one side of a node, it will be moving “down” on the other side. If the modes are tuned to resonate at particular frequencies with particular amplitudes, we can shape the way a guitar sounds.
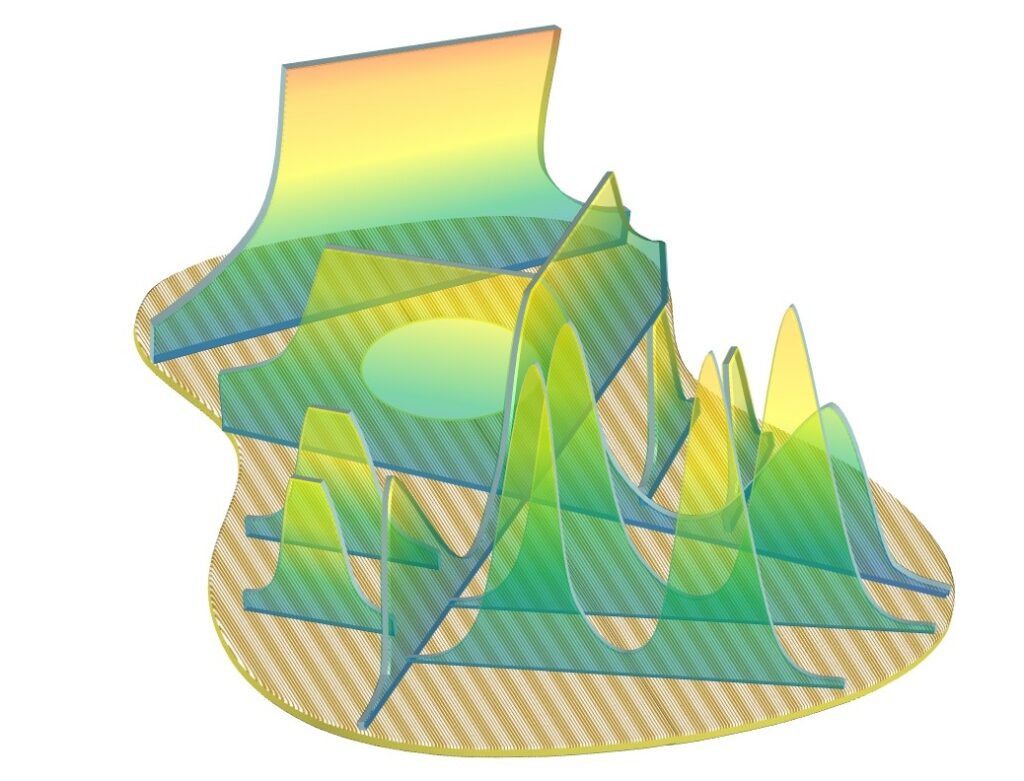
Vibratory modes of a guitar
Six vibratory modes of a guitar are shown below, labelled with the values for the natural frequencies of the steel string guitar photographed. The monopole shape occurs at more than one frequency.
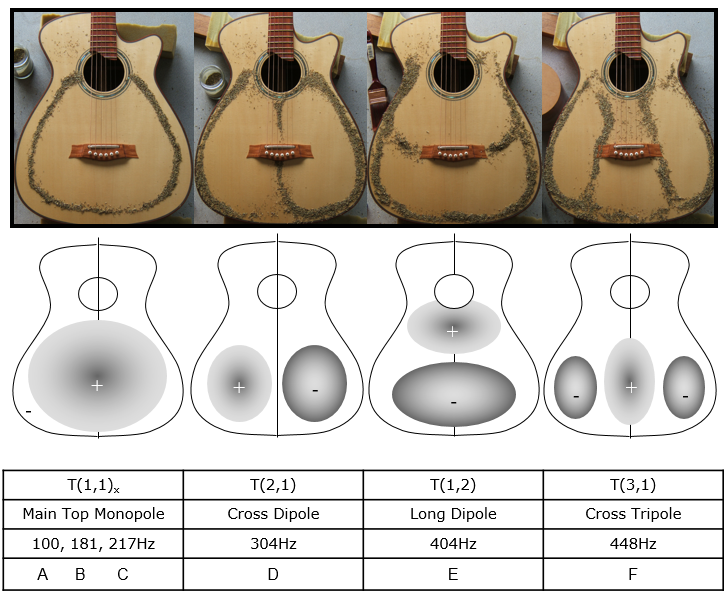
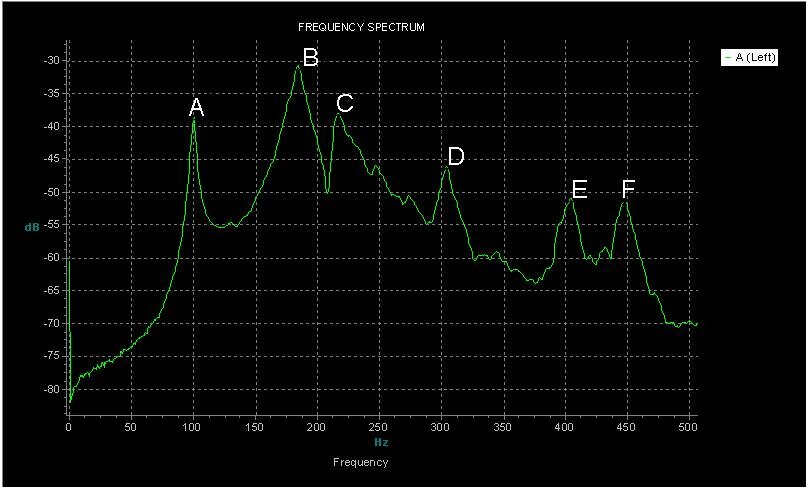
The various modes of vibration have greatest amplitude at their resonant frequencies and so sound is radiated most strongly at the mode resonant frequencies. With respect to radiation from the soundboard, very little sound is radiated by motion other than the motion defined by the main vibratory modes, even well off the modes’ resonant frequencies. Consequently, it is no surprise to find that the peaks in a guitar’s frequency response curve correlate exactly with the resonant frequencies of the various modes of vibration, as we can see below.
Variations in sound
As the sound from a guitar is mainly radiated from its vibrating surfaces, the variations in sound between different guitars and between different types of guitar are due primarily to the size, shape, amplitude, and natural frequency of the various modes. To alter the sound of a guitar it is necessary to alter the size, shape, amplitude, or natural frequency of a mode or modes. Because guitars have a generic tendency to vibrate in certain ways, it requires quite a significant change in the bracing structure to precipitate a change in the shape or amplitude of a mode. Changing a mode’s frequency is a little easier.
Learning how to manipulate the parameters of the modes and, in particular, understanding what the target frequencies should be has been the focus of my research and development efforts over the last 20 years.
The fruit of this research is manifest in my range of guitars. I invented/learnt a lot of techniques for designing guitars that are not documented anywhere else, so it fell to me to write “the book“, with some help from my long time friend Gerard Gilet, who started building guitars whilst I was still at school (which he doesn’t like being reminded of). It is the application of these techniques that make my guitars more responsive, louder and play more in-tune to the equally tempered scale than most other guitars; and it makes them unique.
Guitar Woods
What species of wood you select for your instrument will undoubtedly affect how your guitar will sound, but not nearly so much as you might have been led to believe. The overall design of the guitar rather than the wood, per se, has a much greater impact.
The majority of wood selected for guitars is selected purely on visual appearance, with no attempt whatsoever being made to select it on its engineering or acoustical properties. This fact at the same time accounts for why modern “factory” guitars are rarely either outstandingly good or outstandingly bad. The quality of the tone produced is primarily a function of the guitar’s design, which for many factory guitars has evolved slowly over many years, yielding trusted products.
Guitar woods design
These designs are necessarily focused on producing reasonable results from average wood, because the quality of wood in these guitars, from the engineering and acoustical point of view, is unknown. It is all “average”. Factory guitars tend to be overbuilt, so as to reduce the number of warranty returns.
So if “good” wood happens along, the resulting instrument is more likely to be worse than average rather than better than average, as the resulting instrument will be even more overbuilt than normal. So, paradoxically, for factory guitars, better instruments are likely to result from using poorer quality (from the engineering and acoustical view point) materials.
This presents a clear opportunity for custom builders. Good guitar design and good materials can yield a much better product, and this is how good independent luthiers manage to stay in business.
Even so, few independent builders scientifically measure their wood properties, but some, through long years of experience in remembering what went into their best performing instruments, have learnt what to look for using their visual, tactile and auditory senses.
Important wood properties like density and stiffness (Young’s modulus) can vary by up to a factor of two within the same species of wood, and can frequently vary nearly as much in pieces of wood from the same tree.
It is important in achieving a consistent result that the actual pieces of wood that are about to go into a guitar have their material properties measured prior to use. I test all my top and back wood so that I can determine how thick the plates should be on the guitar to achieve the result I want. If this isn’t done, an awful lot is being left to chance.
The charts below show just a couple of parameters I measure. Details on how these measurements were taken and how they are used can be found in the book.
Mean +/- 1 standard deviation in Young’s modulus for a variety of guitar woods


Plates
The top and back of a guitar, prior to any bracing being applied, are frequently referred to as plates. How thick a top plate should be and how the thickness should be distributed in a top plate (in particular) has often been treated as one of life’s great mysteries. Bracing schemes are attributed with similar mystique, though it is readily apparent from the numerous variants in existence that any scheme that is structurally and acoustically efficient will work.
Of critical importance is how to achieve the target vibrational performance of a guitar panel consistently out of the wood that is available. If the plate characteristics can be maintained as a constant and the applied bracing is maintained as a constant, the assembled soundboard will have constant characteristics provided there aren’t any radical variations in how it is all put together.
We know that the material properties of wood can vary quite substantially. Any two samples of, say, good Sitka spruce will have different densities and long grain and cross grain stiffnesses.
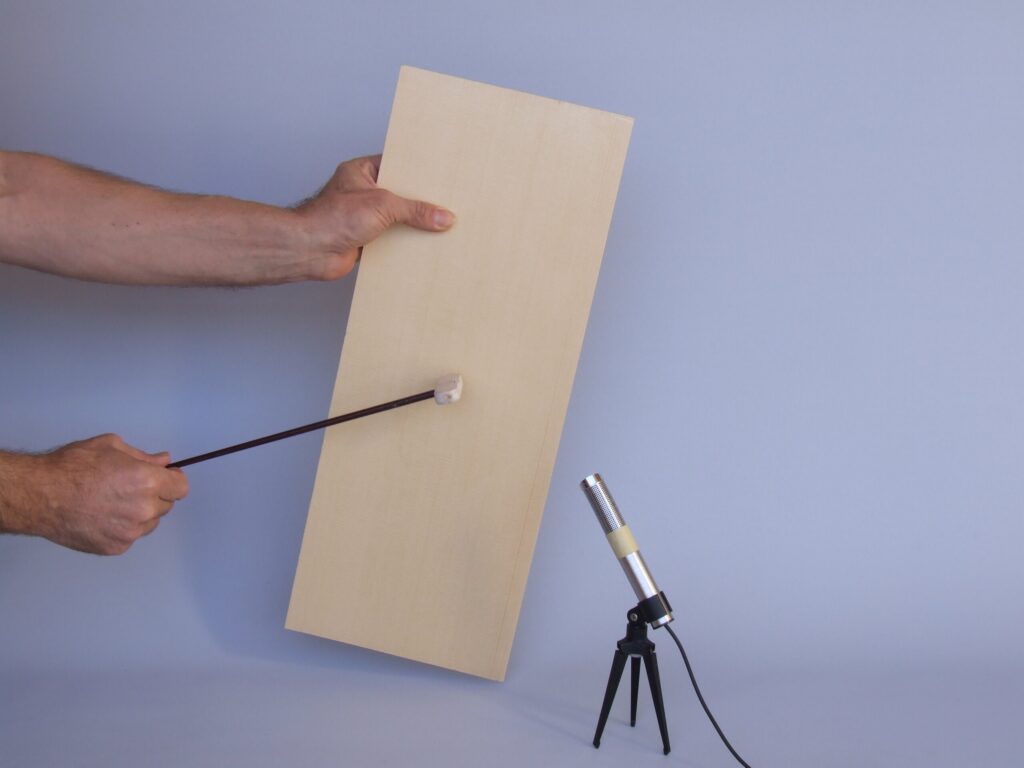
Thicknessing
So thicknessing these two samples to a constant dimension is guaranteed to yield different vibrational results. Trying to find identical samples is, frankly, a fool’s errand. One trick is in finding a method that will give a consistent vibrational performance out of any reasonable piece of wood. The “tap it and listen” technique of the old master builders is certainly valid for those practiced enough to be able to master it. Hence the technique I use is an engineering version of that. What I do is take a piece of top or back wood, the piece I am about to build with, clean it up to uniform dimensions, analyse the tap tone with a computer and get a figure delivered for how thick to leave it. The derivation of the technique is mathematically involved, but ultimately yields a simple and quick methodology which delivers very consistent results.
Top Bracing
In a guitar, the braces act as beams to help support the string loads. The bracing on the underside of a guitar top is an array of beams designed to strengthen the top and control the static deflections due to the string tension, whilst allowing sufficient vibration to couple the strings’ oscillations to the surrounding air; quite a tricky balance to achieve.
The basic principles of beam mechanics that guitar designers need to know are:
Deeper sections make stiffer beams than broader sections. If we double the width, we double the stiffness. However, if we double the depth, the stiffness rises by a factor of eight, i.e. by the factor cubed. If we double the length, the stiffness of the beam reduces by a factor of eight, i.e. the factor cubed.
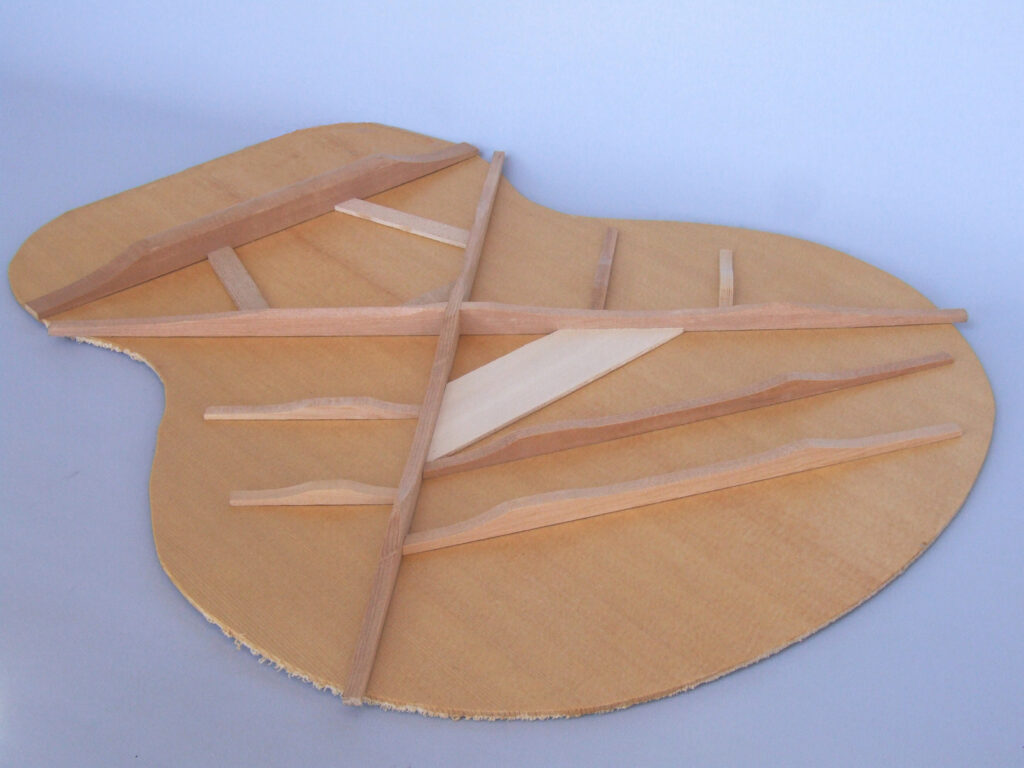
X braced guitars
If we have a look at what that means for a typical X-braced steel string guitar and plot out a mapping of a guitar top’s stiffness, we get a diagram like that on the right. It’s somewhat lumpy and in most X-braced guitars the stiffer parts of the bracing structure are not best placed to support the loads. That’s an inefficient use of materials, meaning that the structure is heavier than it need be and the strings have to overcome greater inertia than they should have to in order to produce sound.

Falcate bracing
I have developed a more efficient design which puts the stiffness where it’s needed, to satisfy both structural and acoustical requirements. It uses less material and so the structure weighs less and is therefore more sensitive, more responsive and delivers more sound.
I call this new style of bracing Falcate bracing.
Falcate means sickle shaped. This new style of bracing is one of the factors that contributes to the high monopole mobility of my guitars that is discussed in “Responsiveness”.
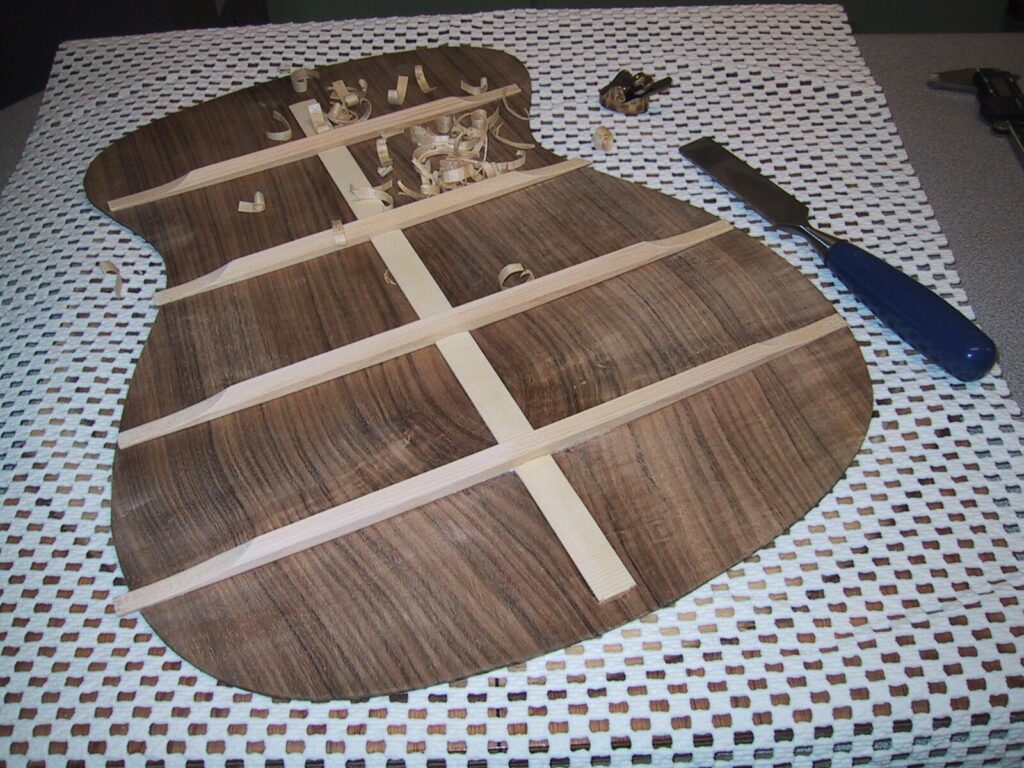
Back Bracing
Back bracing is somewhat simpler to design than top bracing as there is no static loading of consequence. The primary decision is whether to have a live back or not. A live back on a guitar is a shorthand way of saying that the back of the guitar takes quite an active and audible role in the frequency response characteristic of the guitar.
The back, if correctly tuned, can add interesting and attractive coloration to the sound of the guitar whilst also limiting some of the deleterious effects of over-coupling between the strings and the guitar top (i.e. the back can be used to control “wolf” notes). However, use of the back in this way requires very precise tuning of the relationship between the back and the top, particularly on nylon strung guitars.
Get it wrong and the back will just absorb energy from the string and reduce both the quality and quantity of sound output. For more details, modelling results and practical measurements, please refer to the book.
Trevor Gore Guitars back bracing system
At the risk of being overly simplistic, a guitar with a well tuned live back will sound more interesting (will have more “tone”) than a guitar with a non-live back, but the guitar with the non-live back will likely have a little more “volume”.
My standard back bracing system is designed so that it can be easily tuned to the correct relationship with the top. Careful design puts the relationship “in the ball park” initially and final tuning can be done after the guitar is strung.
I build practically all my steel string guitar designs with live backs as I (and the vast majority of my customers) prefer that sound. I build about 80% of my classical guitars with live backs as most of my customers appreciate the additional tonal complexity that the live back delivers over the slight extra volume that the non-live back delivers. However, don’t think you’ll be short of volume with one of my live back guitars. They are more responsive and push out more sound than most other guitars.
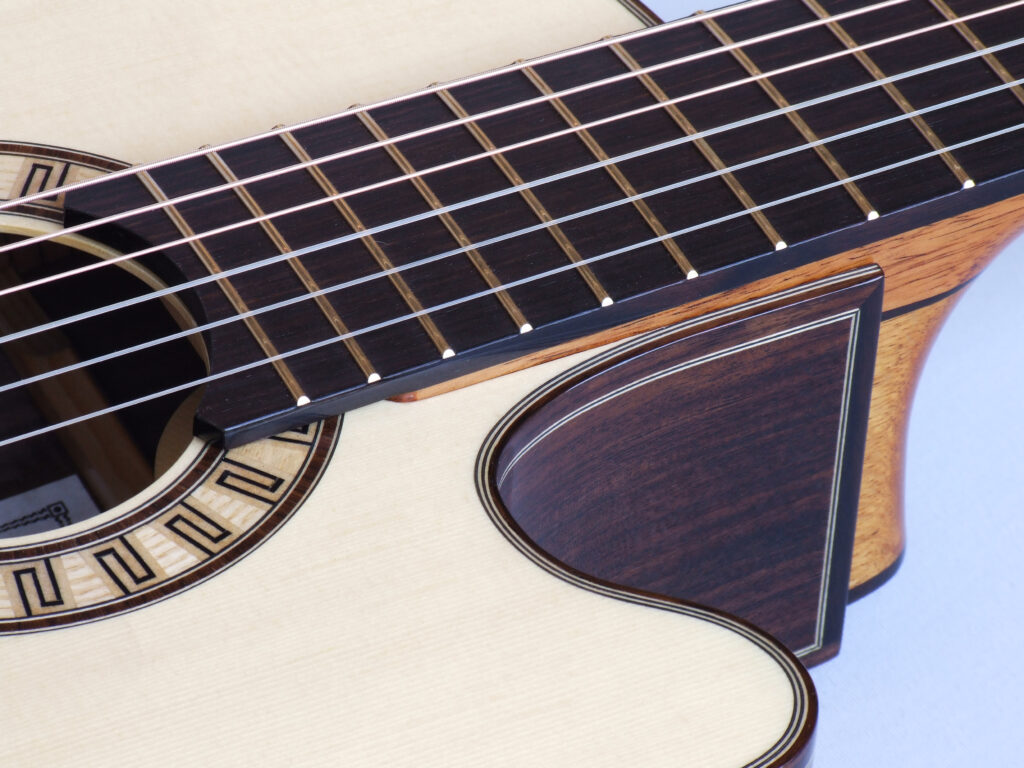
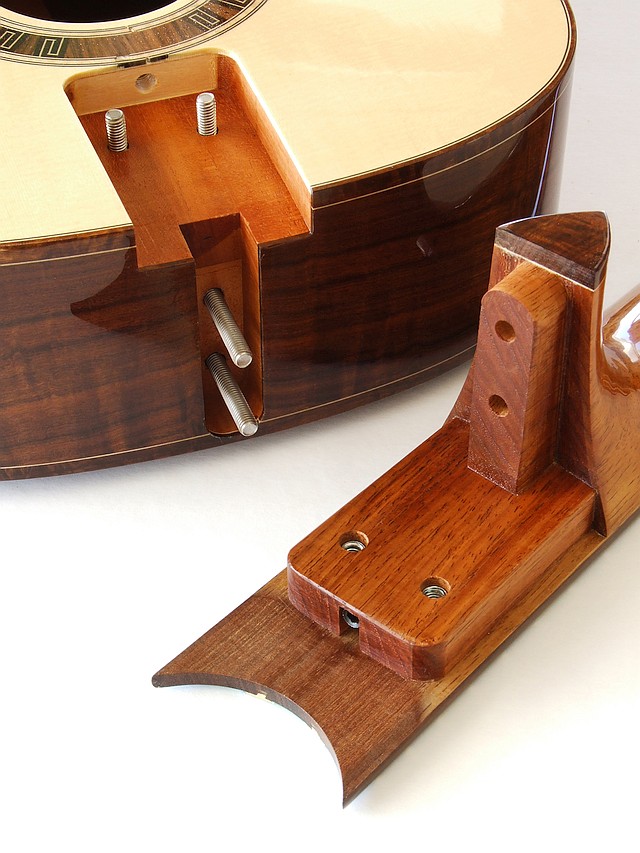
Neck Joint
It is easy to get buried in and confused by the marketing spin surrounding various types of neck-body joint; dovetail, mortise and tenon, direct glued, bolt-on etc. etc, so it is worth standing back and analysing the purpose that the neck joint serves, which will lead us to an appreciation of what really matters and therefore to the most appropriate guitar design.
The neck joint provides a transition from a shell structure (the box) to a solid structure (the cantilevered strut that forms the neck). It has to provide for a fretboard surface of a very specific profile at a very specific angle to the soundboard whilst supporting a large compressive load, and do this with great stability over a very long period of time.
The importance of a properly designed neck joint
The things that go wrong with necks are that the profile changes (backward curve, forward curve, humps and lumps etc. in the fretboard, which are relatively common; twists, warps, misalignments etc. which are relatively uncommon) and that the neck angle changes.
One way around these problems is to eliminate most of them in the guitar design phase and then design so that adjustments can be made relatively easily. The myriad styles of neck joints, where the body and neck start life as independent components, can be adjusted for pitch angle with varying degrees of ease, but are much more prone to fretboard hump at the body join over time.
Frets and levelling
Pulling the frets and levelling the fretboard or resetting even a glued-in dovetail neck are not such major jobs as adjusting the neck angle of a guitar with Spanish foot construction, where the neck is built as an integral part of the box structure.
Logic brings us inexorably to the conclusion that a bolt-on neck is the most sensible option, provided it is well engineered, with the neck wood continuous under the fretboard into the upper bout of the guitar, which virtually eliminates fretboard hump at the body joint.
The neck joint I designed is shown in the photograph. You can see that the neck bolts to the body using four socket head cap screws inserted from inside the guitar body. The heel bolts screw into a brass bar that is embedded down most of the height of the heel (no threaded inserts here!) whilst the fretboard bolts screw into captive T-nuts beneath the fretboard. It is very strong, very stable, and adjustable if required just by removing the bolts. I use this type of neck joint on nearly all my guitars. The video below shows me removing the neck from a classical guitar:
The adjustable neck joint
Some players, however, prefer neck joints that they can adjust themselves, so that they can alter the guitar’s action at will for different playing styles, different music or different venues. I can accommodate those needs, too, with my adjustable neck joint (a tilt neck) that can change the action on a guitar without using tools in about 5 seconds. You never have to play a guitar with the wrong action ever again!